2009-12-08

Some ins-and-outs of twisting sterling square rod

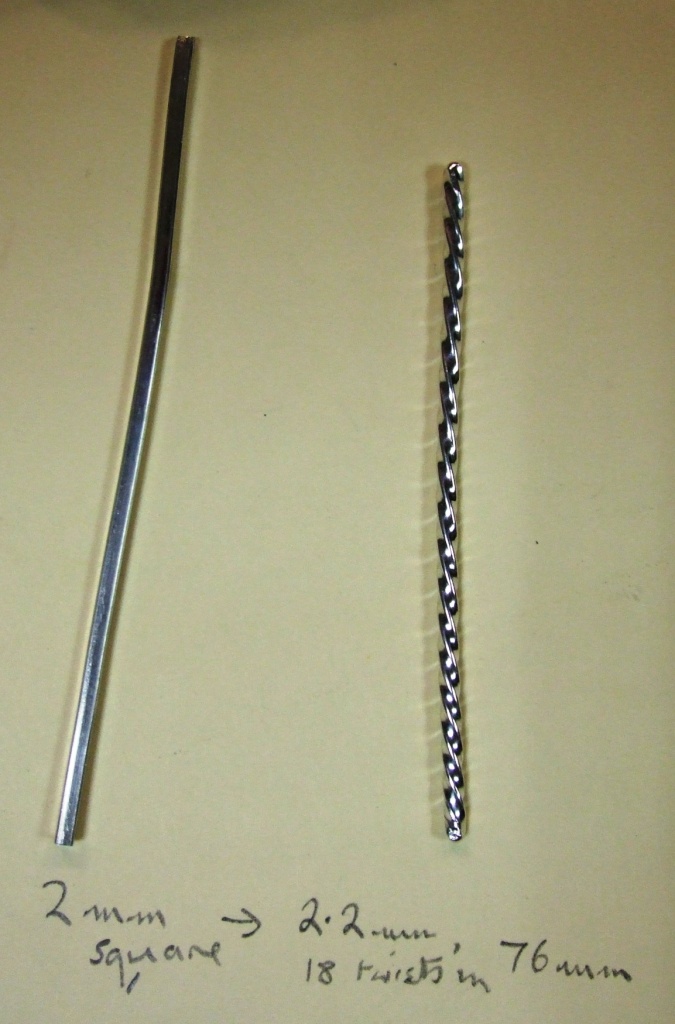
In pursuit of making a twisted square-section sterling ring, some old square rod of about 2mm side was annealed then twisted with one end held in a vice, the other in pliers. This gave a twist of about 2.2mm diameter, with about 18 twists in a length of 76mm. The first picture below shows the original square rod, and the twist result. I subsequently found that it was much more convenient to grip with rod at the operator end with bulldog grips, resulting in an easier, more even and denser twist.


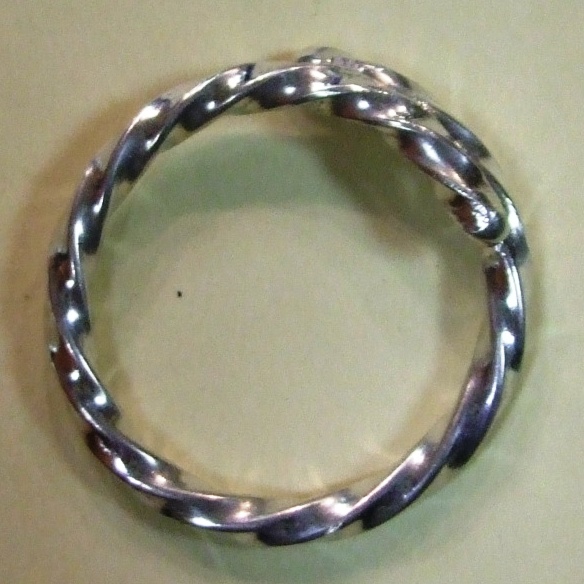
This twist was then annealed and formed into an open (unsoldered) ring before polishing, as in the second picture above. The result, although reasonably pleasant after polishing with radial polishing wheels, was aesthetically too coarse a gauge. It was then re-annealed, straightened then untwisted. To my surprise, I managed to then roll it through the mill wire rollers to re-form perfect 2mm square rod. These latter wire rollers were not actually much use, because their minimum gauge is in fact 2mm – this accounts for the prevalence of 2mm square rod in my scrap box (all produced from old sprues). So it was rolled through the flat rollers instead, rotating the rod a quarter revolution each pass, to give a final gauge of 1.8mm square. It was then twisted in two stages with annealing to give a diameter of 1.85mm with 46 twists per 76mm.
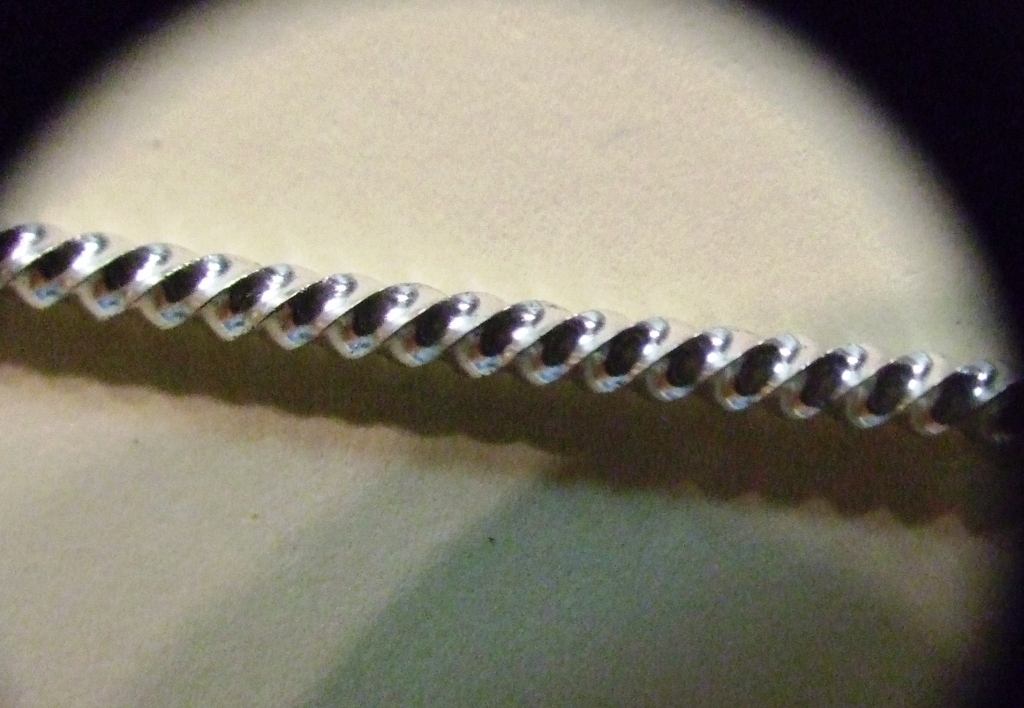
The third picture above shows the very sharp profile of the spiral twist made by the above process, which naturally would be expected to be uncomfortable if made into a ring. So another section of the twist was lightly sanded and repolished, as shown in the last picture.

2009-12-02

Making a rotary burnisher from an Allen key

After a tip published in Orchid by J Morley in 2004, I used an alumina separating wheel to shorten the shorter end of a 7/64" Allen key to about 1cm, and used the same wheel to roughly grind the end to a dome. Later I discovered that this latter operation was probably a waste of time, a better way was to fit the Allen key into the pendent drill and rotate the cut end against progressively finer grades of wet abrasive paper. This had the great advantage of producing a profile (providing the drill was slowly lifted and lowered to additionally shape it in another plane) which is maximal size for burnishing. The result was a very attractive looking tool, requiring no heat treatment (the same tool can be made using a bur, but this requires heating, bending, shaping, re-hardening then tempering - a lot more work).
Unfortunately, actually using the tool is a different matter. I tried it on various old pieces of cast silver with porosity, and although it bashed the surface very satisfactorily, not all porosity was closed up, and I was uncertain how to finish the resultant surface. I tried the abrasive radial wheels which did indeed get a wonderful polish, but did not remove undulations in the surface caused by the rotary hammering effect. It is faintly possible that my method of getting a maximal size burnishing surface is at fault, perhaps a much smaller burnishing surface would get better results. Of course, I realise that if nothing else, it may be useful as a power texturing tool!

2009-11-23

Making & using plaster gems with PMC

Although CZ and many other gemstones can be successfully fired into PMC, I often find that the brilliance (at least of CZ) is slightly diminished by this process. So I made a flexible rubber mould of some 5.5x5.5mm CZ hearts, then cast the pavilions using a fairly hard casting plaster. Each tended to have a small missing piece at the point of the pavilion due to an air bubble, but this proved not to be a problem. When well dry, they were embedded at girdle height in plastic PMC shapes (themselves embedded in flexible rubber moulds), the whole de-moulded, dried and fired at 800C. This higher temperature possibly helped to denature the plaster sufficiently that it was easy to clean out from the cured (i.e. sintered) PMC. It would only remain then to set the coloured CZ hearts using a spot of glue. However that is not what I actually did - on a whim, I melted dichroic glass fragments into the heart-shaped cavities in some samples of the uncured PMC, whilst also firing some 15mm PMC heart shapes with 5.5mm heart-shaped coloured CZ embedded in the uncured (unsintered) silver. In the side-bar to the right, you will see examples of the fired-in-place CZ (right-most two hearts, amethyst and orange respectively) along with the left-most three specimens which had variously coloured dichroic glass pressed in them while red-hot and fluid.

2009-10-27

Enamels on copper plate on silver

Various pieces of PMC had areas that were electrolytically copper plated, then covered with areas of reptile green and ruby red transparent enamels. On firing the results were mediocre, however with hindsight I realise that I chose two unpromising colours - in particular reptile green goes brown on copper, rather than the beautiful green it goes on silver flux on copper. I then went on to embedding small copper shapes in PMC and applying enamel, though in most cases coping with the oxide was the biggest problem.

2009-10-05

Detection of mercury vapour

After some research in my chemistry books, I settled on cuprous iodide / silver iodide paste mixed with precipitated sulphur as a possible reagent. The reagent was made by double decomposition of silver nitrate and copper sulphate solutions added to a solution of potassium iodide. The resulting yellow paste was painted onto filter paper and allowed to dry. On exposing to mercury vapour in a glass vial, the exposed area turned a satisfying but not very visible light amber colour. I doubt that it would detect the vapour from the mercury spill which occurred some years ago in the kiln room...

2009-09-13

Over-cooking enamels on fine silver...

The first picture below is of a matrix of 6 rows (5 different transparent enamels from the top down, none on the bottom row) and 7 columns (6 different fluxes from the left, none on the rightmost) fired to completion at around 820C. The second picture is of the same specimen subsequently accidentally fired for another 10 minutes at around 850C. The five enamels were probably ruby, aqua, tangerine, reptile green and amethyst, all from the "professional jewellery enamel" range from Vitrum Signum.

2009-09-10

Thermochromic enamels

Anyone using enamels would soon find that some are thermochromic, displaying different colours at different temperatures. The pictures below show the transitions of two different enamel colours on fine silver; the outer corner squares and the central square were enamelled with transparent reptile green, the remaining areas in transparent ruby.


From this one can see that when red hot, not surprisingly the whole mass glows; then, on cooling, the reptile green areas turn from red to black (perhaps about 400C?), next turning to amber (around 250C?), then yellow/grey/green (not illustrated, around 150C) before becoming a rich green when cold. The ruby however, although reasonably pink after a single firing, when fired several times becomes progressively more and more grey, finishing (as here) in strange fibrous opaque clay-like swirls.

2009-08-24

Detection of lead in dust samples

I relied on literature in school chemistry books which proposed acetic acid. Once dissolved, the presence of lead is easily detected by adding a solution of a dilute soluble sulphide or polysulphide, giving a dark-brown / black precipitate of lead sulphide. However in my experiments with small fragments of cleaned lead strip, I found it did not dissolve in acetic acid even in high concentrations over a period of 8 hours. Heavily corroded lead also did not dissolve. Further reading suggested that dissolved atmospheric oxygen is required. Adding a small amount of hydrogen peroxide rendered all lead and at least some corrosion compounds readily and rapidly soluble in acetic acid solution. The problem now is that any precipitate of lead sulphide tended to get oxidised to white lead sulphate by surplus peroxide, compromising and complicating the original test scheme. However I did manage to show the presence of lead in 0.1% lead acetate solution used as a control , although it was more problematic in 0.01% solution.

2009-05-29

Dichroic glass on 'liquid enamels'

A rolled-out copper coin (i.e. rolled with a jewellery mill to remove the pattern and give more real estate to work on) was dipped in 'liquid flux', a powder which I mixed with distilled water to a suitable consistency. It was then fired, giving an unusually smooth and glossy clear coat. I then gave it a layer of 'liquid white', mixed from powder in the same way. Both powders had been bought from Vitrum Signum a year or so ago, awaiting a suitable time for experiment.

On firing, there was a pleasant smooth slightly matte white coating. To liven things up, I painted some little dashes of cobalt oxide in water into the surface, staining it with some dark blue patches. These remained matte through one or two more firings before starting to become glossy, presumably through vitreous material making its way through the surface oxide. Finally I laid a piece of dichroic glass on the enamel and fired that; on cooling, I found that I could 'pop' the top layer of glass from the dichroic, leaving an iridescent coating on the coin. Also, a significant amount of the white had been gradually dissolving into the clear flux below, leaving a bright image of the coin beneath.
The second piece, a small rectangle of copper with unwanted enamel experiments, was also treated to a small rectangle of dichroic glass fused to the surface. Or rather, two pieces, but the right-hand one slid off in the furnace.

2009-05-04

The eyes have it...

The piece on the left is plain fine silver (from a rolled-out fine silver casting grain) with a faint leaf-vein pattern hammered in, and some enamel on to test colours. It was very boring, so I fused a pair of fine-silver eyes with purple enamel to the surface.
The right-hand piece is again fine silver, PMC this time, moulded from a real leaf (starberry). This gave the veins in reverse which was more attractive than the original. After enamelling, I thought it also benefitted from a pair of eyes, perhaps I've just seen too many cast leaves...

2009-05-01

Glass enamels

I found a few pots of "glass enamels" which I had bought some two or three years earlier from a company called Potterycrafts, when I was thinking of doing some more glass fusing. Checking in the catalogue, I found that the firing temperature was just under 600C. Five samples were made, and two illustrated below;

I added a semi-abstract semi-pastoral image in primary red, blue and yellow to a discarded piece of copper which had a grey enamel surface, and fired it at 800C, out of curiosity. To my surprise, the colours didn't burn out, but gave the image shown. A second enamel piece, this time with a rather nice abstract leopard-skin pattern, had some spots added in the same primary colours, and fired at 600C. The result is the piece in orange / brown with darker spots.
The glass enamels were extremely easy to paint after adding enough distilled water to make a thin cream; so I am considering getting some "painting enamels" if possible, which are presumably equally painterly in effect and intended to be compatible with metal rather than glass. There have been no signs of distress on the enamels above.

2009-03-08

Burn-out time

The final part of the Winter courses casting component meant that I carefully packed 20 ceramic shells in expanded polystyrene chips inside a couple of large square plastic boxes (both originally held Turkish dondorma!), and carted them off in the train to the workshop near Wimbledon.The weather was very cold, somewhat breezy but clear when I got the furnace dome set up and the task of burning out the waxes underway. To my dismay, of the 60 or so items on top of the shells, around 9 came to some kind of grief, although later about half of these were to be repaired at least to some extent. Unfortunately one of the casualties was the wax of a 12cm pig, intended to be cast in silicon bronze. This gave an audible loud ‘pop’ inside the furnace dome, breaking into four or so large pieces.My feeling is that the increased failure rate (about double the usual) is probably related in some way to the temperature at which the waxes had been stored, and that at which the burn-out took place. However in at least one case, the failure was due to the fact that a collection of items on a shell had insulated the outlet wax stalk from the heat; the expanding wax had nowhere to go but out through the top, bursting it off. This particular item was later given a repair.I wondered, as on several occasions in the past, if the number of failures could be reduced with strategic additional 'sprues' intended to allow leakage of wax during burn-out.

2009-02-14

Carving hard plaster

I have a series of small plaster figures, each more than 5 years old, which I would like to modify and hopefully improve before recasting in bronze or other metal. The plaster was an alpha-hemihydrate type, hence very hard. I found it carves rather nicely, but slowly, with an HSS burr in a pendent drill. This leaves chatter and other tool marks on the surface of the plaster, but frequently I found these marks rather appealing. It also ‘carves’ well with a small coarse alumina-composition grinding tool in a pendent drill. Various shapes are available, unfortunately I find that the smaller and more precise shapes are a less coarse compound and take longer to cut.
Having some of the old rubber moulds available, which I made around the same time, I tried pouring copies in a much softer (’potters’) plaster, but the incidence of air bubbles was so high as to make the casts nearly useless. I expect that if the unset mix, and subsequently the moulds containing the freshly-poured mix, were subject to reduced pressure with a vacuum pump, they may become just what I need. Unfortunately I mislaid my aspirator some time ago, and this kind of cheap and effective pump now seems difficult to find.